I've already posted this on another site and thought I'd add it here for anyone interested.
I've recieved a few questions recently about how to set up a DIS ignition system. So I figured I might as well be the guinea pig. You'll need a coil pack & oil pump drive from a 3x00 and either the 7x sensor from the 3x00 or an abs sensor from just about anything (mine's from a '99 durango). I preffer the abs sensor because it has a nice strong neodymium magnet that gives a clear strong signal.
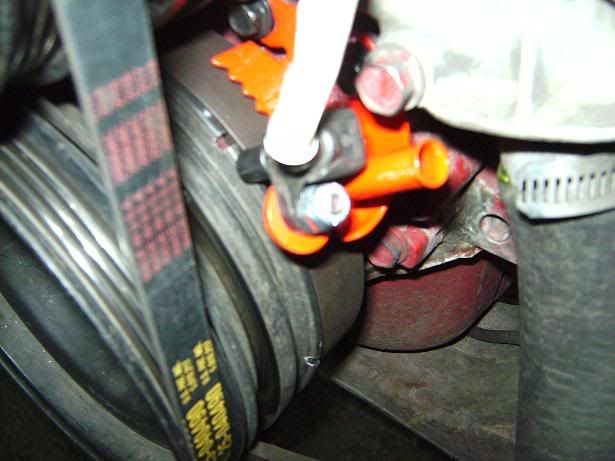
Here's a pic of the 'bracket'. It's a washer welded to the side of the timing tab with a flat ground on one side to keep the sensor from rotating. Placement on the tab isn't critical since you're going to adjust it later, just needs to line up with the reluctor. Adjust the air gap to .04"

You can either cut notches in the pulley using this diagram as a template or transfer it to a 1/4" steel plate to make a reluctor.

When you swap connector ends on the abs sensor make sure you have the polarity correct. Check the sensor with a multimeter by probing the connector and placing the sensor on a piece of steel, then removing it. Should read positive voltage first then negative as you remove it. Voltage is in millivolts.
Rewiring should work as follows.
DIS pin -----> Connection
A ----------> Ground to block
B ----------> Ign pwr (coil orange or pink wire)
A ----------> Crank sens. high
B ----------> N/A
C ----------> Crank sens. low
A ----------> Bypass (dist. pin B)
B ----------> EST (dist. pin D)
C ----------> Tach Lead (coil black w/ white stripe wire)
D ----------> N/A
E ----------> Refrence (dist. pin C)
F ----------> Ground (dist. pin A)
You don't neccecarily have to replace the distributor with an oil pump drive, but replacement's simple. Just 1 bolt. You won't need new plug wires either, just move the longest to the far side and route behind the plenum, then trim the rest to fit. The coil pack almoast bolts in place, all you need to do is cut off one side of the coil bracket and enlarge the bolt holes a bit.
And finally here's a bin to get you started, post #158. When using a $6E bin the max spark is set to 90* (the max possible), base timing to 0* and 50* is added to the whole cool spark compensation table. This will limit you to 40* max, but you won't need as much spark with 3x00 heads.
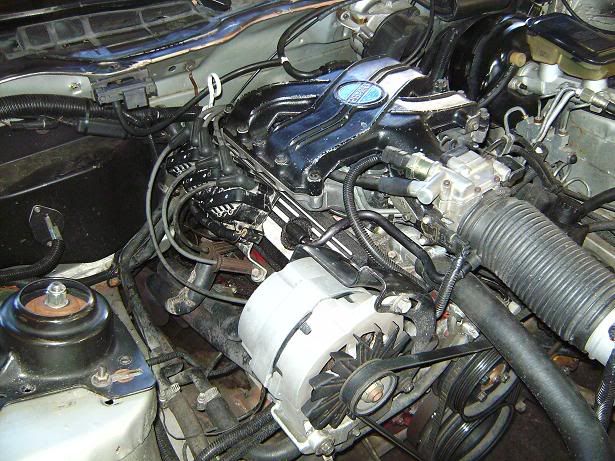
After everything's assembled start it up and verify your timing with a timing light against what's in the table. You can program another chip with the main table set to 10* to make things a little easier. You will need to make your own timing marks somewhere if you weld a washer to the timing tab since the sensor moves with it. And please, don't try adjusting the sensor with the motor running . Here's a pic of it assembled. Looks right at home, doesn't it?

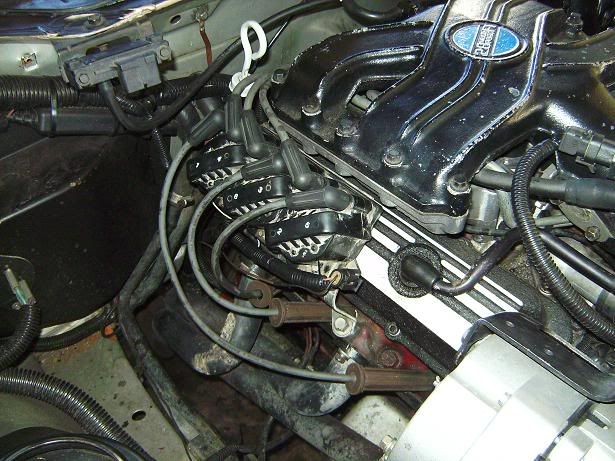
And a close up.

I've recieved a few questions recently about how to set up a DIS ignition system. So I figured I might as well be the guinea pig. You'll need a coil pack & oil pump drive from a 3x00 and either the 7x sensor from the 3x00 or an abs sensor from just about anything (mine's from a '99 durango). I preffer the abs sensor because it has a nice strong neodymium magnet that gives a clear strong signal.
Here's a pic of the 'bracket'. It's a washer welded to the side of the timing tab with a flat ground on one side to keep the sensor from rotating. Placement on the tab isn't critical since you're going to adjust it later, just needs to line up with the reluctor. Adjust the air gap to .04"

You can either cut notches in the pulley using this diagram as a template or transfer it to a 1/4" steel plate to make a reluctor.

When you swap connector ends on the abs sensor make sure you have the polarity correct. Check the sensor with a multimeter by probing the connector and placing the sensor on a piece of steel, then removing it. Should read positive voltage first then negative as you remove it. Voltage is in millivolts.
Rewiring should work as follows.
DIS pin -----> Connection
A ----------> Ground to block
B ----------> Ign pwr (coil orange or pink wire)
A ----------> Crank sens. high
B ----------> N/A
C ----------> Crank sens. low
A ----------> Bypass (dist. pin B)
B ----------> EST (dist. pin D)
C ----------> Tach Lead (coil black w/ white stripe wire)
D ----------> N/A
E ----------> Refrence (dist. pin C)
F ----------> Ground (dist. pin A)
You don't neccecarily have to replace the distributor with an oil pump drive, but replacement's simple. Just 1 bolt. You won't need new plug wires either, just move the longest to the far side and route behind the plenum, then trim the rest to fit. The coil pack almoast bolts in place, all you need to do is cut off one side of the coil bracket and enlarge the bolt holes a bit.
And finally here's a bin to get you started, post #158. When using a $6E bin the max spark is set to 90* (the max possible), base timing to 0* and 50* is added to the whole cool spark compensation table. This will limit you to 40* max, but you won't need as much spark with 3x00 heads.
After everything's assembled start it up and verify your timing with a timing light against what's in the table. You can program another chip with the main table set to 10* to make things a little easier. You will need to make your own timing marks somewhere if you weld a washer to the timing tab since the sensor moves with it. And please, don't try adjusting the sensor with the motor running . Here's a pic of it assembled. Looks right at home, doesn't it?

And a close up.


Comment