Been away for a while, during which it looks like all the maintenace how-to's have dissapeared (along with everything else). I am trying to find some fairly detailed instructions with pictures if possible on changing the intake gaskets on my Mom's 99 3100 for my Dad to follow. Do these still exist somewhere or am I SOL?
Announcement
Collapse
No announcement yet.
3100 intake gasket howto
Collapse
X
-
I try to get them back up for you. We moved servers and changed software, so not everything is back in order yet. Glad to see you know where to come for information though!-Brad-
89 Mustang : Future 60V6 Power
sigpic
Follow the build -> http://www.3x00swap.com/index.php?page=mustang-blog
-
I'll copy and paste my post from the FAQ section of the DC site since you have to be a member to view the post.
Its not a complete how to, Its only how to seal the gaskets properly basically. I wrote it for all the people swapping 3400's into their Jbodies, No point putting in a used engine without doing the LIM gasket. And no point doing a gasket if your not going to seal it properly. I saw a few posts from guys about their gaskets leaking within a year after they had done them so I took the time to write this out as to how to seal the gaskets properly.
Might help a small amount.. I don't know if brad wants to use this info as well for the site for gasket sealing but here ya go:
Originally posted by v6h.o.Its always a good practice if installing a used 3100/3400 engine in your car to first off replace the Lower Intake Manifold (LIM) gaskets. GM 60v6's are unfortunatly well known for thier leak prone LIM gaskets (which mostly has to do with Dexcool) Before the engine even goes into the car I'd recommend replacing the LIM gaskets. You don't know how old they are, What condition they're in, or If they'll develope a coolant leak the minute or day after your new engine is installed. Rather than have an issue with coolant leaking not only Out of the engine but also INto the engine (note bearing failure) its best to just replace the LIM/plenum and valve cover gaskets for peice of mind.
I figured I'd post this a how-to properly do LIM gaskets, seems like a simple thing to do really, but with the way these gaskets are setup, Problems can/could incure due to improper sealing and torquing.
First off, Dissasemble and remove the Lower intake.
As most have noticed by now the LIM gaskets on any 60v6 cannot be removed/installed without removing the pushrods.
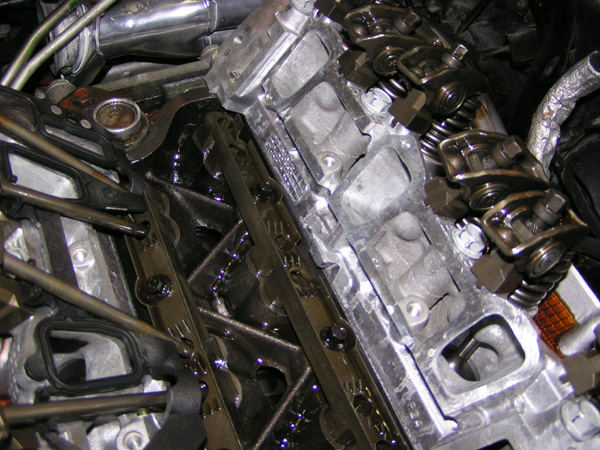
Once apart, Ensure that all block/head sealing surfaces are clean and free of oil. Failure to do this will result in leaks.
Before installing the gasket take your GM RTV (Room Temperature Vulcanizing) silicone sealant -GM P/N 12346141 (Canadian P/N 89022195) and put a dab in each corner where the gasket meets the head/block
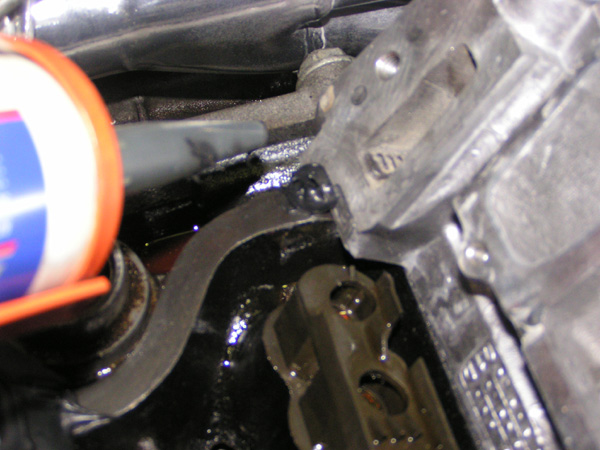
This ensure's that the gasket seals properly at these joins and that you will not get any seepage or oil leaks from the engine at this area.
Once you have this dab of RTV there, Install your gasket
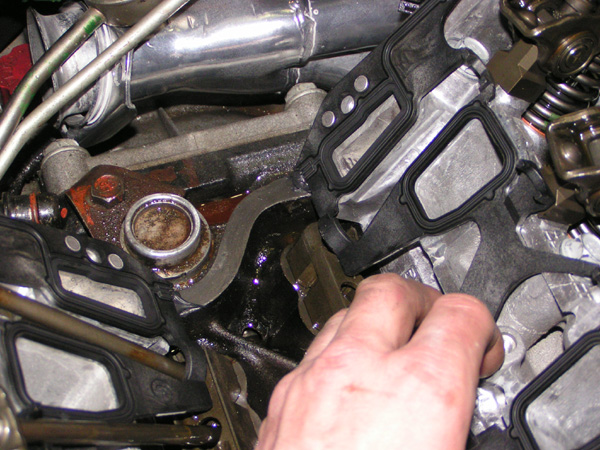
Now you can install your pushrods through the gaskets.
Remember Exhaust pushrods are longer and Intake are shorter.
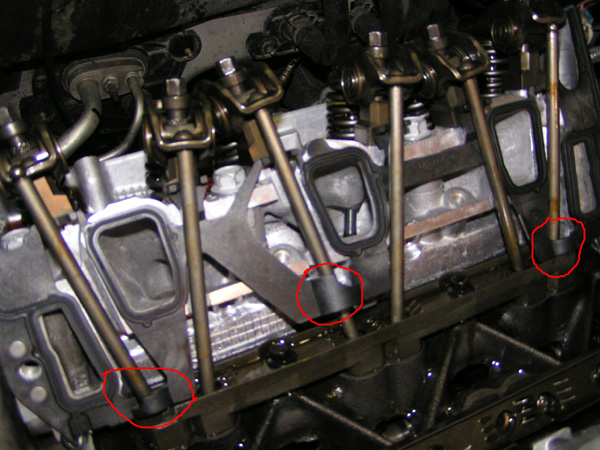
One quick easy tip to know where which one goes where (besides noting the valve placement) is on the LIM gasket you will notice that for each gasket there are 3 pushrods that go Under the gasket and 3 that go over it.
The pushrods that have the plastic of the gasket looping around the pushrod are all Exhaust pushrods. And those that do not have anything around them near the bottom are all Intakes.
Note the circled marks. these are the exh pushrods.
Once the pushrods are in place, its time to install the RTV on the block end sealing area's.
Apply the RTV to the end seal location, Apply the RTV UP onto the bottom of the gaskets as well to get a good seal.
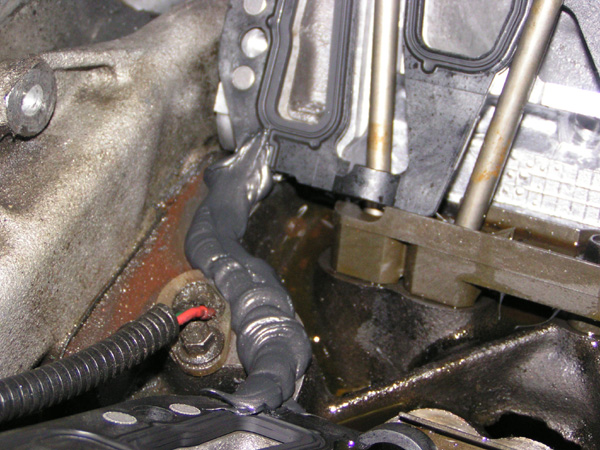

The RTV should be about 8-10 mm thick and 3-5mm wide on the end seals. Too little and the manifold won't seal.
When the LIM is installed the excess rtv will just squish out which is fine.
Once the rtv is in place, Install your LIM,
The LIM bolts are a torque to yeild bolt and should be replaced when removed. However I know most will not do this, so...
Before installing your used LIM bolts, Clean them all off with some brake clean.
Apply Blue Loctite to the threads of the 8 LIM bolts.

Install the 4 center vertical bolts in the LIM, Slowly and evenly tighten down the 4 center vertical bolts.
Important, There are two styles of GM gaskets for the 3100/3400, The OLD style was just a regular LIM gasket. The NEW style LIM gaskets have 2 steel tabs located in each end of the gasket to help keep from excessively crushing the plastic. You'll note that the gaskets in the above pictures are the NEW style gaskets.
With the different style of gaskets there are different torque specs for each.
LIM TORQUE SPECS, OLD STYLE GASKETS:
Lower Intake Manifold Bolt (Diagonal)
13 N·m
115 lb in (9.5 lb ft)
Lower Intake Manifold Bolt (Vertical)
13 N·m
115 lb in (9.5 lb ft)
LIM TORQUE SPECS, NEW STYLE GASKETS WITH METAL TAB:
Lower Intake Manifold Bolt (Diagonal)
25 N·m
18 lb ft
Lower Intake Manifold Bolt (Vertical)
13 N·m
115 lb in (9.5 lb ft)
Torque your Vertical bolts first to required spec. Perform TWO passes on the vertical bolts as with torquing them down the LIM sucks in more and then results in lossening of the bolt to LIM torque.
Next install and torque your Diagonal LIM bolts. To get axcess to the two bolts that normally a socket/ratchet would not fit on, Use a 10mm shallow universal style socket and an extension to properly torque each bolt.
Dont forget to torque your Rocker Arm Bolts
* First Pass
14 N·m
124 lb in
* Final Pass
30 degrees
When Installing the Valve covers, Put a Dab of silicone in the corners between the LIM and the Head where the two meet and have the indent.
Once all back together IF coolant was in the engine or if the engine is in the car you will get some coolant spillage into the engine valley, After replacing the gaskets FIRST thing you need to do is replace your engine oil, Coolant will ruin engine bearings if left in the oil.
If you follow this you'll have no issues with leaks or improper sealing.Colin
92 Sunbird GT, 3200 Hybrid 13.99@ 95.22 (2004)
90 Eagle Talon TSi AWD 10.54 @ 129mph.
Comment


Comment