Announcement

Collapse
No announcement yet.

HELP!!! Changing Headgaskets in 93 Lumina *PICS ADDED*

Collapse
X
 
  • Filter
  • Time
  • Show
Clear All
new posts

  • HELP!!! Changing Headgaskets in 93 Lumina *PICS ADDED*


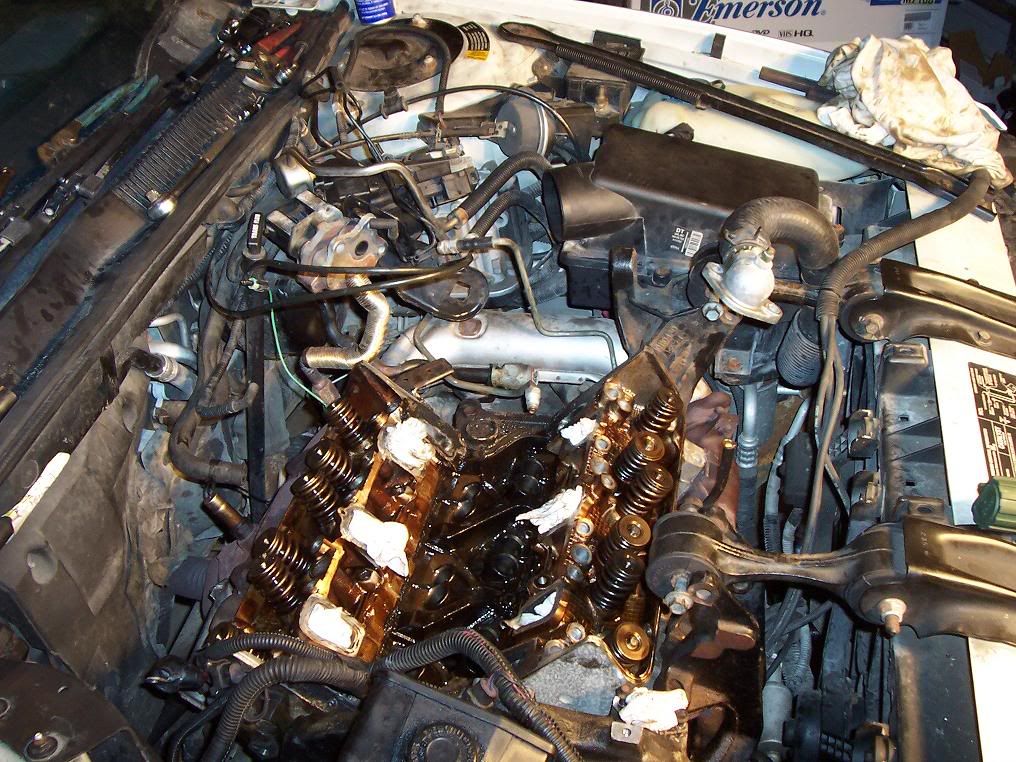
    Hello all, I'm a noob here and I'm helping a friend change the HGs in his 93 Lumina. I'm running into a couple problems, neither one of us is a mechanic in any way... so this is just a "see what we can do" type of thing.


    1.Basically we got out all of the head studs, but we still have the exhaust manifolds to deal with. On the rear mani, passenger side/middle (near O2) bottom stud.. I think it is stripped. What is the best way to get this thing out? We were using a 10mm socket (the right size for the rest of the studs) and it feels stripped, but we can't see anything to make sure.

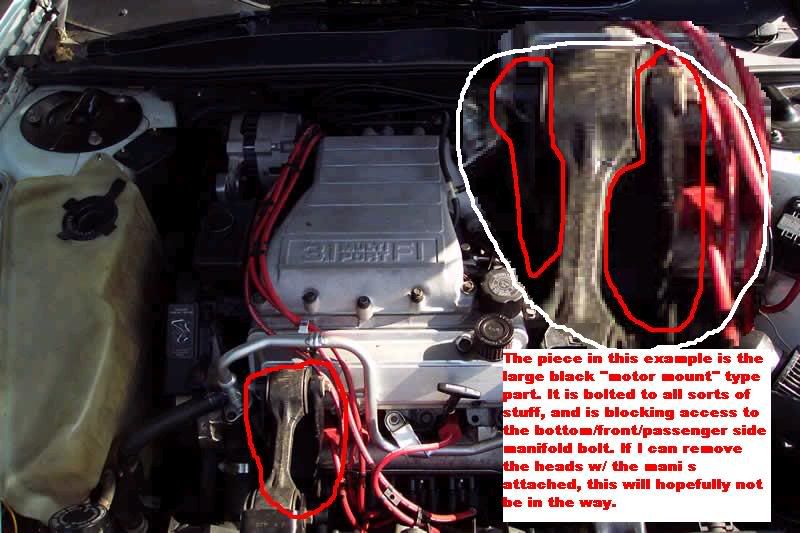
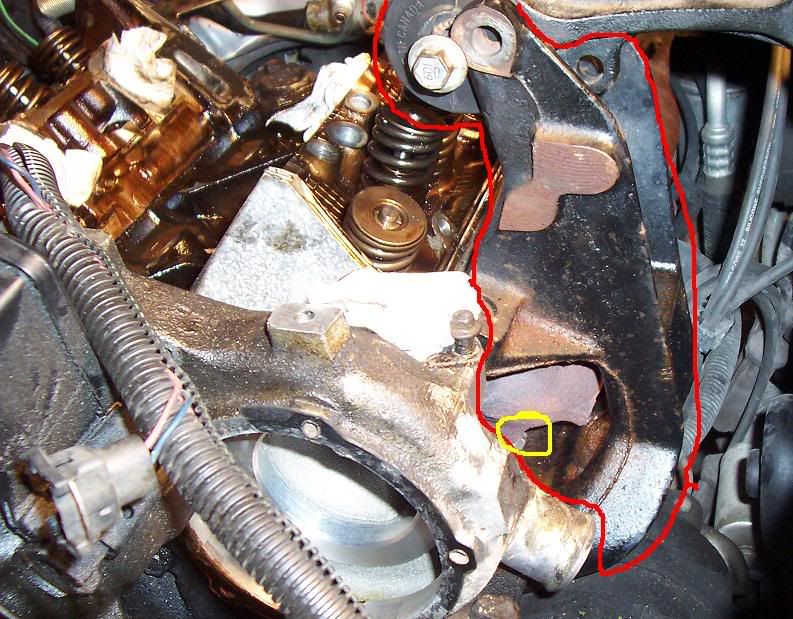
    2.The motor mount on the passenger side... the massive black thing bolted to the front of the engine... how the heck do we get that off? We took out the top 2 bolts holding it to the head, and then 2 more bolts by the air pump... there is one more above the oil filter ... does this have to come out? Are we doing this correctly? I think it has to come out because the exhaust manifold bolt that is on the passengger side bottom is not going to come out unless this thing moves out of the way. Do we need to remove the driverside mount also?

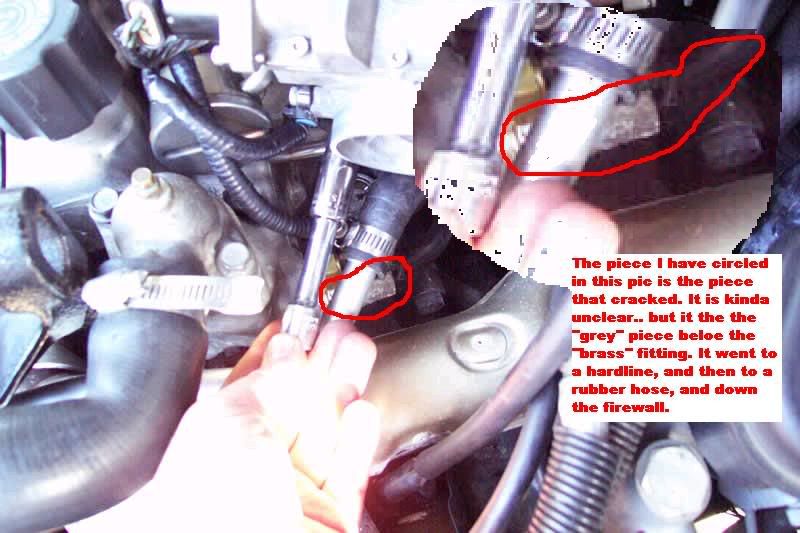
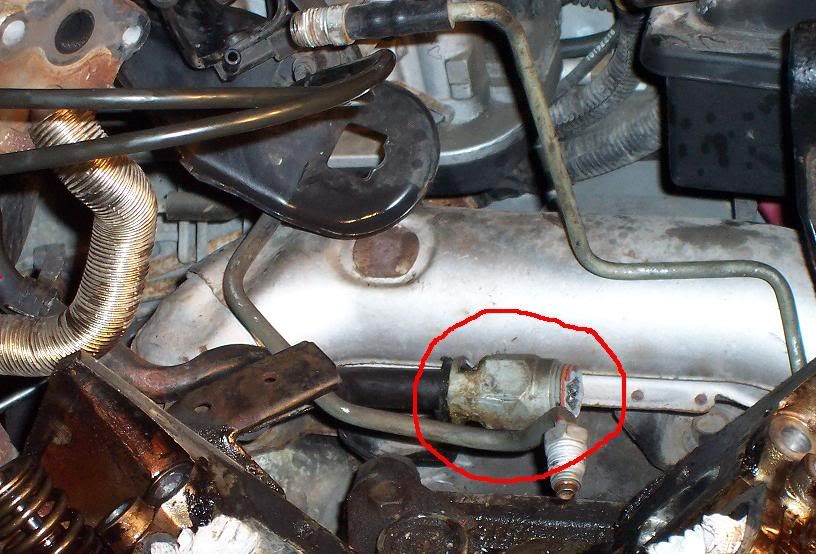
    3.The "waterline" that is attached to the bottom of the t-stat housing that has to be removed before you can take of the lower plenum cracked. 1. I dont know how to get it off the pipe to take to the auto parts store to replace, and 2. I don't know what its called to see if they have it in stock.

    4.While removing the lifters I realized how dirty the rest of the inside of the block must be from having the coolant/oil mixture sloshing around in there... is there a better way to clean it other than a couple of oil changes after we get it together?

    5.We unplugged a lot of stuff to get to the back of the engine.. basically all of the clips and hoses that were attached to anything near the back of the motor for more access... is there a diagram that shows where all this stuff goes back? We were keeping pretty good track of everything initially, but then realized it would take all year to do it at that pace, so we just started taking stuff off, moving it to the side, and digging deeper and deeper into the engine bay.


    Finally.... if anyone is in the Buffalo NY area and would like to lend a hand in getting this fixed, or if anyone would like to make a couple bucks helping, I would gladly pay. Obviously we would like to help also, so we won't be standing there with out hands in our pockets. We took this on as a learning experience, and trying to do some of our own work (800 bux for a mechanic was too much to spend on the car). Now that we have reached a couple of very hard parts of the tear down.. I don't want progress to stop and I don't want to quit.

    If anyone has any answers or tips, or pics or diagrams... ANYTHING?!?!?!? I would greatly appreciate it.

    Thanks,
    Jack

    BTW - Before I saw this site, I thought I was the only one crazy enough to wanna try to make my Lumina fast...

  • #2
    RE: HELP!!! Changing Headgaskets in 93 Lumina

    My biggest comment is, unbolt the downpipe from the rear manifold (from under the car) and remove the crossover, and pull the heads with the exhaust manifolds installed. It is much easier to do this way! Do the same when you re-install the heads. Bolt the exhaust manifolds to the heads first, then bolt the heads in. Then go back and bolt the rest of it up.

    Other than that, I've only done it on a 3100, and there are several differences between the two engines. I'm not sure about what you are talking about with the motor mount without a picture. I'd have to look to see what waterline you are talking about as well. As far as the electrical connections, most connectors are keyed so that they will only match what they plug into. There are a couple similar plugs, but usually the wires won't reach the wrong "mate".
    -Brad-
    89 Mustang : Future 60V6 Power
    sigpic
    Follow the build -> http://www.3x00swap.com/index.php?page=mustang-blog

    Comment


    • #3
      Thanks for the help... hopefully I can get some pics up tonight or tomorrow.

      I planned on doing pics of everything and making a "documentary" out of it... so I guess I should start now.

      I will definitely try to get the heads off w/ the mani s attached, I believe this will be much easier.

      I will look for pics currently available to try and show you what the motor mount looks like.

      Thanks.
      Jack


      EDIT -


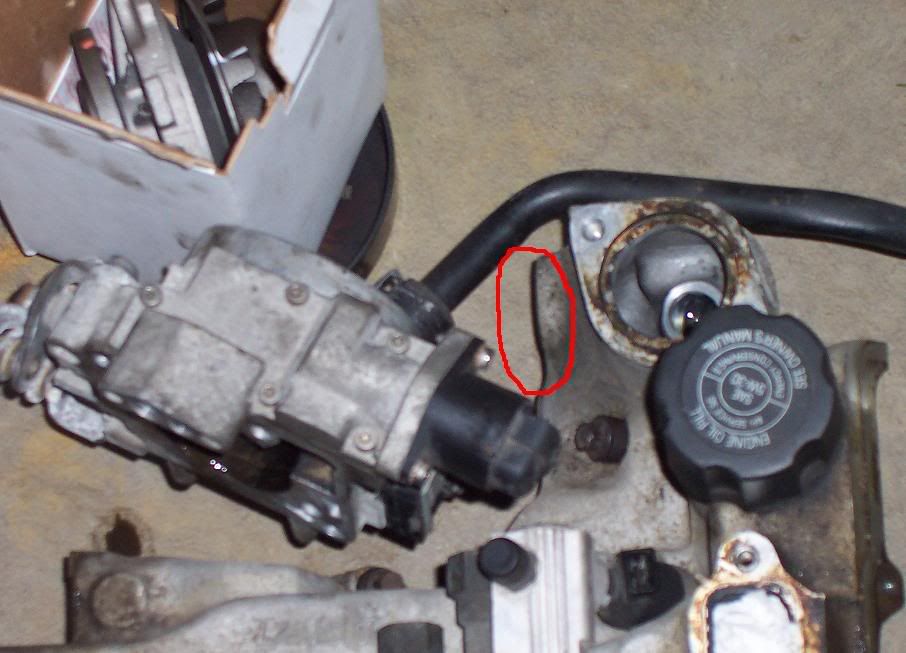
      This is the broken fitting

      and this is the motor mount piece...


      Sorry for the horrible quality, and thank you to whoever put those pics here :

      Comment


      • #4
        More pics....
        This is the broken fitting. This pic was taken looking from the p.side to the driverside. Left is the firewall, and right is the radiator.


        This is zoomed out for reference.


        This is where it goes into the intake t-stat housing...


        Sorry I couldn't get a better pic, the intake reeked of gas from the fuel rails, and I didn't want to smell like gas at work.


        Finally... this is the big black thing I keep referring to that is like a "motor mount"

        As you can see there is a manifold bolt (yellow) that cannot be removed unless this hunk of steel is removed. For reference.. that turbo lookin thing is for the water pump (which will be replaced) and this pic was also taken from the pass. side.

        Do I have to remove the springs from the head or can that stuff stay intact? was there anything else on the head that didn't have to come off that we already removed, what else has to be removed?

        Thanks for any and all answers/responses... they are all greatly appreciated.

        Comment


        • #5
          Ok, that would be the heater tube that you broke. That sucks. Did you get the rest of it out of the manifold I hope? Anyway, that will most likely have to be gotten (that can't be good grammar!) from either a dealership or a junkyard. And its kind of important. Hmm... It'll most likely be car specific as well, because I'm pretty sure the heater tube routing is different between body styles. I'd call around to a couple local junkyards first before going to the dealer.

          As far as the motor mount goes, you will most likely have to fully remove it to get to that bolt. Or, as I stated before, pull the head with the manifold still installed and it "should" clear.
          -Brad-
          89 Mustang : Future 60V6 Power
          sigpic
          Follow the build -> http://www.3x00swap.com/index.php?page=mustang-blog

          Comment


          • #6
            Those heater hose connections should be in stock at Autozone, they're somewhere around $20


            Cliff Scott
            89 BerettaGT
            04 AleroGX
            Cliff Scott
            89 BerettaGT
            04 AleroGX

            Comment


            • #7
              you have to TOTALLY remove that bracket to get the head out.

              There are 2 bolts on top. One is the star bolt.

              You have to drop the AC COMPRESSOR. There are 3 bolts around the pulley for the com pressor, and 2 on the BACK of the compressor (near the oil filter.

              When you get the AC compressor down (you do not have to take it out of the car. Just loosen the 5 bolts that hold it on, and let it drop down and rest on the subframe. Also, when you remove the 2 REAR BOLTS from the compressor, make sure they are the BRACKET BOLTS, and not one of the bolts that holds the lines ot the compressor.

              After the compressor is out, there are 4 more bolts to remove. 2 are at the base of the bracket. One is under the MOUNT part itself ( the thing that the dog bone is attached too. Just feel around for it). The other is close to where the oil filter is.

              All in all, you get that bracket off, you have to remove the COMPRESSOR, and 6 bolts.

              I just put a new one in my car. If you need me too, I can try to take a pic of it so that you can see where all the bolts go (I can't do it until tomorrow).

              in this pic, you can kinda see the bracket out of the car. This should give you an idea of what you are dealing with. On the table, it is on the LEFT HAND SIDE near the end.


              Taylor
              1988 Olds Cutlass Supreme 3100 MPFI
              1990 Pontiac Grand Prix STE 3.1 MPFI
              1994 Olds Cutlass Supreme convertible
              1998 Lincoln Mark VIII
              "find something simple and complicate it"

              Comment


              • #8
                Those heater hose connections should be in stock at Autozone, they're somewhere around $20
                Hmm, I didn't figure that would be available. Shows what I know!!
                -Brad-
                89 Mustang : Future 60V6 Power
                sigpic
                Follow the build -> http://www.3x00swap.com/index.php?page=mustang-blog

                Comment


                • #9
                  Thanks a ton guys. That thing is a beast huh? What a PITA. Looks like I'm going to be removing that tomorrow... and getting those heads out.


                  My other question, though not as important as the ones you have alreadfy answered... was what else has to come off of the heads? Did I take off enough already?

                  Also - What else should I clean while the heads are off?

                  Comment


                  • #10
                    I think that you have pretty much taken everything off that you will need too (other than the AC bracket).

                    The only thing I would do no top of what you have already listed is the OIL PUMP DRIVE seal. The oil pump drive it the round thing on the DRIVERS SIDE that is on the block.
                    On your 4th pic (the one with the lower intake off, and the pushrods showing), you can see it. It is that round thing that is covered with oil next to the crossover on the block.

                    It is just a simple $1 part. All you do is take the 1 bolt off (should be a 15mm). With the bolt and bracket thing that holds it down off, you just pull it straight up. It is kinda hard and you might have to play with it. You just cut the old O-RING off, and slide the new one on. Then you have to press it back down (I had to tap it in with a rubber mallet). Also, when you take it off, the oil pump drive ROD might come out as well. Just put it back in, and make sure that it is all the way in and lined up when you out the drive back in.
                    Taylor
                    1988 Olds Cutlass Supreme 3100 MPFI
                    1990 Pontiac Grand Prix STE 3.1 MPFI
                    1994 Olds Cutlass Supreme convertible
                    1998 Lincoln Mark VIII
                    "find something simple and complicate it"

                    Comment


                    • #11
                      good idea.

                      I know exactly the part you are talking about.

                      I'm not looking forward to getting the "AC Bracket" off the car, but it will definetely get progress moving forward again.

                      Thanks for the help guys.

                      Comment


                      • #12
                        Here is a pic of the lower part of the AC bracket. This is the same as what should be in your car, but I had cut off the top part for the headers. This should help you see where the 4 holes are.


                        And just to be sure of the oil pump drive, here is a pic of mine as well.

                        Taylor
                        1988 Olds Cutlass Supreme 3100 MPFI
                        1990 Pontiac Grand Prix STE 3.1 MPFI
                        1994 Olds Cutlass Supreme convertible
                        1998 Lincoln Mark VIII
                        "find something simple and complicate it"

                        Comment


                        • #13
                          Awesome.... very helpful.

                          Comment


                          • #14
                            heads are on, both intakes are on (the upper intake went on dry... was this a good thing?

                            I'm trying to remember how all the hoses and wires went (under the upper intake) the ones that go to the TB and the box on the back of the UIM... and I'll crap my pants if this thing starts... The most I had ever done before this was watching my Mustang block get built, and doing the plugs on my Trans Am and my 3000GT VR4... this was a whole new monster.

                            Comment


                            • #15
                              The water nipple quick connect is standard on most GM vehicels, I broke several and every time I had to retap. On my 91 GP GTP the old style water connection was a smaller bore and tap, so I had to bore and tap.

                              Did you have the heads boiled or cleaned, and checked for flatness??.

                              I have changed headgaskets on these engines and there are a pain royaly, and these engines like knukle skin. Which reminds me I need to do some work on my Euro after the Z is road worthy.

                              Even harder is a 350 in a formula Firebird.
                              I am back

                              Mechanical/Service Technican

                              Comment

                              Working...
                              X