Announcement

Collapse
No announcement yet.

Camshaft removal issues - Need help please

Collapse
X
 
  • Filter
  • Time
  • Show
Clear All
new posts

  • Question : Camshaft removal issues - Need help please

    Hello everyone,

    1996 Grand Prix SE w/ 3100 stock

    I decided to replace all gaskets down to the heads since I am flushing the dex-cool out and going green. There was no serious water issues in the crankcase. Though, I was probably only weeks away from bursting the coolant gasket. It was cracked and warped out, definately ready to burst.

    Anyways, I have a few questions.

    When attempting to remove the stock camshaft, it seems to hit something 1" out. Everything has been removed such as lifters, sprocket, chain, torque plate, ect.

    The camshaft is being removed through the wheel well. I modified the body by cutting a 3" diameter hole allowing the camshaft to go through. The wheel is also removed so I have a straight shot to pull it w/o having to raise the block. I also fashioned a bolt on plate to cover the 3" hole I created.

    Well, I used a long bolt to attach to the camshaft to act as a removal tool for grip and control so I don't damage the bearings.

    No matter how I manipulate the camshaft, it will not pass some obstruction 1" into removal. I'm sure there are no lifters over looked and according to the procedure, I have all components removed for camshaft removal. When the cam is 1" out, while turning it, I can feel the bearings as the object blocking it from removal. I tried gently rotating and shifting it's position to work it through while not damaging the bearings.

    No matter how I approach the removal, it will not budge past that 1" mark.

    Now, what am I missing or could there be something wrong with the cam bearings?


    Also, the camshaft rotates freely when in it's proper place. Though, the rotation is lightly stiff even with pushrods removed. It will not spin on it's own after I spin it. It feels smooth in rotation but almost like there is syrup in the bearings.

    Is this normal rotation? Or should my camshaft spin free like a skateboard wheel?


    Thanks much guys. If there was any forum that could answer my problems, it would be here.

  • #2
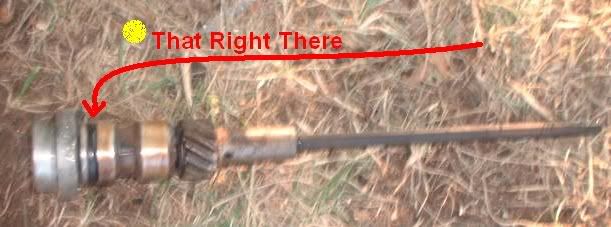
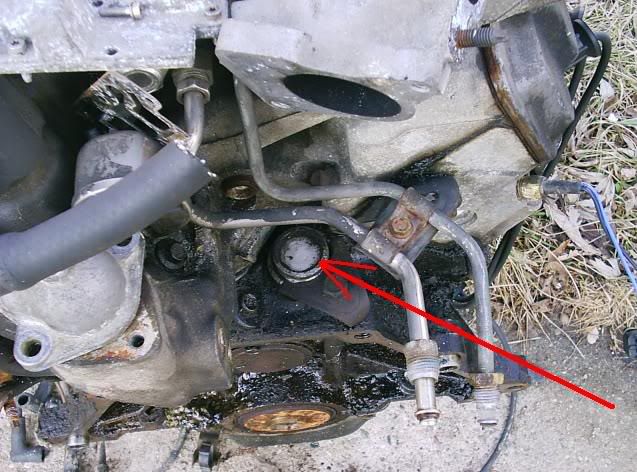
    You remove the oil pump/distributor shaft unit?


    Lifting my front wheels, one jack at a time.

    Comment


    • #3
      Originally posted by 1988GTU View Post
      You remove the oil pump/distributor shaft unit?


      No I didn't and I know exactly what you are talking about.

      Wow, thanks man!

      Now, do I need to remove the oil pan, oil pump to remove that shaft?

      If that is it I will be very happy because I was beginning to wonder if something was damaged or worn beyond repair while in the engine bay.

      It figures I had to over look something as simple as that. I wonder why that isn't mentioned in my set of instructions I have? Oh well.

      If that needs removing to pull the camshaft then I believe that will do it.

      This is great because I am getting stage 1 heads, 3400 top swap, higher lb. injectors, new fuel pump, adjustable FPR, performance cam (haven't selected it yet), cold air intake, 65mm TB and rebuilding the exhaust to 2.5" diameter with high flow cat and flowmaster 40's

      I was seriously bummed out when the camshaft would come out. Now I am excited.

      This is my first time seriously modding a car. Once I am done with this 3100 Grand Prix, I want to get down a build a serious performance vehicle.

      Though I did find a working 3800 supercharged v6 with tranny for $800. Only 30k miles. Thing is the body was wrecked, bent frame. So I might try to swap it but I might be a bit over my head. I never did an engine swap before let alone trying to cram a 3800 in the engine bay. I heard it is a tight fit.
      Last edited by Schmieder; 12-23-2009, 12:44 PM.

      Comment


      • #4
        That part can come out from up top without dropping the pan. The UIM and TB just have to be off.
        Lifting my front wheels, one jack at a time.

        Comment


        • #5
          Now don't be talking about 3800's on here!

          It's Christmas for God's sake! The birth of Santa!

          Think of the children DAMMIT!

          Comment


          • #6
            Xmas is not for two days!!! Don't bring it any sooner you you you Mr. I want xmas today geezer!! lol.... I still have to find one thing for someone and it's getting tough finding it at the right cost.


            I need more hours or wages...Both would be nice!
            Lifting my front wheels, one jack at a time.

            Comment


            • #7
              Originally posted by asylummotorsports View Post
              Now don't be talking about 3800's on here!

              It's Christmas for God's sake! The birth of Santa!

              Think of the children DAMMIT!
              hey hey hey....lol

              Both my kids have enough presents. If I were to get them anymore, they would be beyond spoiled.

              One is 9 yrs and the other is 14 months. Combined I must have spent around $500.oo. Not counting the tree, stockings, dinner, ect...

              The 3800 L67 would be MY gift, lol.

              But I'm not working on this project until later January. I have a budget up to $3,500.00 for mods, paint and interior rebuild. All DIY stuff.

              I was a pro painter for 10 yrs and I have practically painted everything under the sun except for cars and bridges. I have no doubts I can produce a spectacular finish.

              Going to use an HVLP with a fine tip and sand with 00 Steel wool in between coats. the finish is going to be as close to mirror as possible.

              Ah shes going to be one sharp looking, neck bending ride.

              Only about 50k on the engine so I feel it is worth the investment.
              Last edited by Schmieder; 12-23-2009, 03:03 PM.

              Comment


              • #8
                Originally posted by 1988GTU View Post
                That part can come out from up top without dropping the pan. The UIM and TB just have to be off.
                Ok. I just tried removing it and it will not budge. It rotates but will not come out.

                Will I damage anything if I try to apply force to remove it? I did remove the one bolt holding the metal brace. Any other bolts I am missing?

                I did try a vice grip and gave it a good tugging but not as much as I could in fear of breaking something. It feels like something is holding it in, obviously lol. Or can these things bake in after continual operation?

                Thanks for all your advice. You made my day!


                If interested in knowing, these are my plans for this car.

                3400 heads stage 1 from WOT
                3400 competition intake manifold set from WOT
                Full roller rockers at 1.6:1
                Performance Camshaft (not sure what one yet)
                Custom Cold Air Intake routed to hood scoop.
                65mm TB
                Megasquirt ECU (still need to investigate which one)
                Custom headers (weld up kit)
                2.5" exhaust with high flow cat and flowmaster 40's
                stronger injectors, fuel pump and adjustable FPR
                Underdrive Pulley w/ 200w alternator
                Replace timing chain and sprocket
                replace crank and cam sensors
                Mold a ram air scoop in hood w/ grill (fiberglass resin and cloth)
                Sand, prep and paint body.
                Seat covers, steering cover, vinyl stain, carpet replacement.
                Legaly tint windows.

                I think that is everything...

                When I paint the car, the bottom ground effects will be Jet Black. The top half will be a really dark stormy gray. There will be a 6" wide Jet Black racing strip down the center. The spoiler and side mirrors will be Jet Black. I have a small chrome dragon that I am going to attach to the front where the Pontiac Symbol is currently located.

                I am going to incorporate turbulators on the short radius bend in the cold air intake system. I plan to design them exactly like the ones used in jet aircraft intakes to maximize airflow. To scale, shape and placement.

                Pretty much max out the engine as n/a. This is my learning project. After this one I am going to build a real beast of beasts. Carefully picking the frame and custom building the engine for the highest boost possible/reasonable.

                My goal will be to build high performance cars and sell them. My knowledge is so-so right now but I am going to school for performance engines soon and my love for this stuff is strong.


                So anyways, thanks again for your help.
                Last edited by Schmieder; 12-23-2009, 02:59 PM.

                Comment


                • #9
                  1995 Monte Carlo LS 3100, 4T60E...for now, future plans include driving it until the wheels fall off!
                  Latest nAst1 files here!
                  Need a wiring diagram for any GM car or truck from 82-06(and 07-08 cars)? PM me!

                  Comment


                  • #10
                    Push the cam back in. Then move over to that DIS cap. Put a wide slender flat blade screwy driver between cap and block. Tap it in between the two surfaces and pry up. Now tap it up after you pry it up as much as you can. There's an O-ring in there that is probably adding resistance along with the hex key shaft which will come up or stay down in the hole. It doesnt matter in which position you put it back, but it is very important that you do seat it back in when you are reinstalling it. That shaft that you will see drives the oil pump. The O-Ring is replaceable... It should have came with with your complete rebuild kit, if not goto the parts store and buy it. it should be no more than 4 bucks and should be black or brown. The brown one is choice, black is fine, but I've found those to fail sooner than the brown one. It's a common issue and easy to replace.

                    HTH.
                    Lifting my front wheels, one jack at a time.

                    Comment


                    • #11
                      Originally posted by 1988GTU View Post
                      Push the cam back in. Then move over to that DIS cap. Put a wide slender flat blade screwy driver between cap and block. Tap it in between the two surfaces and pry up. Now tap it up after you pry it up as much as you can. There's an O-ring in there that is probably adding resistance along with the hex key shaft which will come up or stay down in the hole. It doesnt matter in which position you put it back, but it is very important that you do seat it back in when you are reinstalling it. That shaft that you will see drives the oil pump. The O-Ring is replaceable... It should have came with with your complete rebuild kit, if not goto the parts store and buy it. it should be no more than 4 bucks and should be black or brown. The brown one is choice, black is fine, but I've found those to fail sooner than the brown one. It's a common issue and easy to replace.

                      HTH.
                      Ok, I will get to that later today. Got some last minute stuff to do for the Holidays.

                      Man, thanks a ton. I was really frustrated with the cam issue.

                      I'll go with the black gasket as suggested. No reason why not too unless I can only get the brown one.


                      Take care and have a Merry Christmas!!!

                      Comment


                      • #12
                        Brown is suggested, black is fine to use just don't be disturbed when it fails.
                        Lifting my front wheels, one jack at a time.

                        Comment


                        • #13
                          Originally posted by 1988GTU View Post
                          Brown is suggested, black is fine to use just don't be disturbed when it fails.
                          oh, i had it backwards. I'll go brown then.

                          I firmly believe in quality over cost.


                          When I'm all done I'll post before and after pics for everyone to see.

                          Comment


                          • #14
                            Originally posted by 1988GTU View Post
                            Brown is suggested, black is fine to use just don't be disturbed when it fails.
                            X2^


                            Store your photos and videos online with secure storage from Photobucket. Available on iOS, Android and desktop. Securely backup your memories and sign up today!

                            Comment

                            Working...
                            X