Announcement

Collapse
No announcement yet.

Home Made Fuel Injector Cleaning Machine

Collapse
X
 
  • Filter
  • Time
  • Show
Clear All
new posts

  • #46
    My mistake... the fuel rail has 4 hold down bolts...

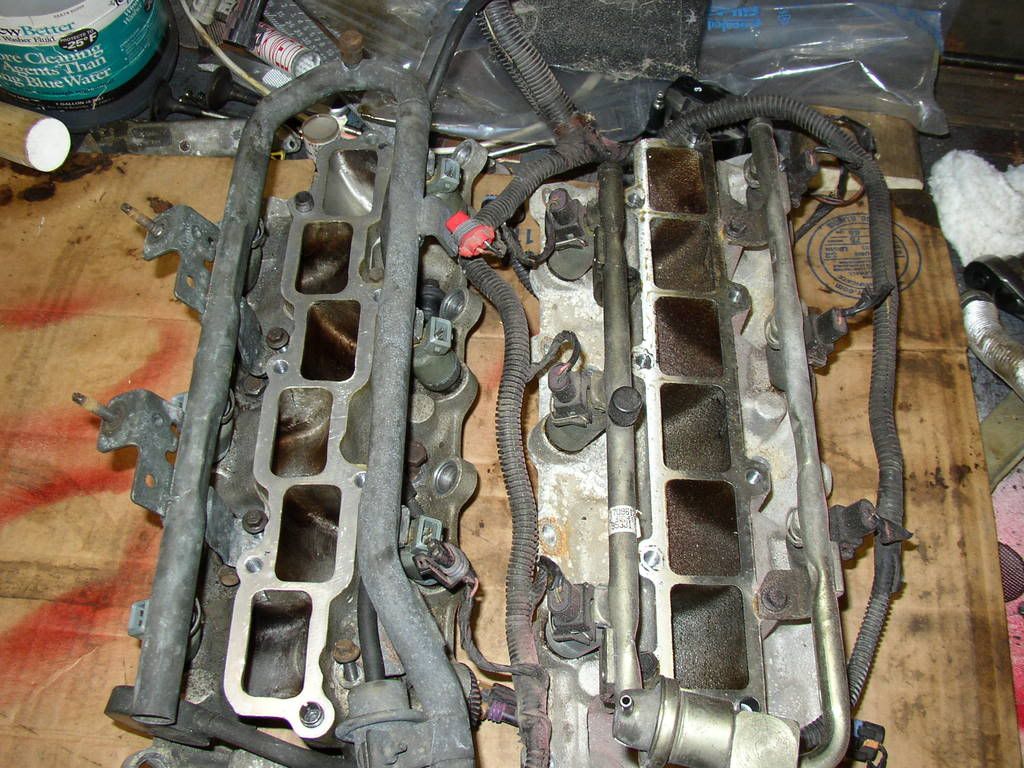
    Here is a nice comparison pic from above of the 91-95 style LIM (on the left) and 96/97 style LIM (on the right, of course). I'm not sure this will help you out with figuring how small it is compared to the other engines LIMs.


    As you can see by this pic of the heads from above, it mounts down low in the "V"
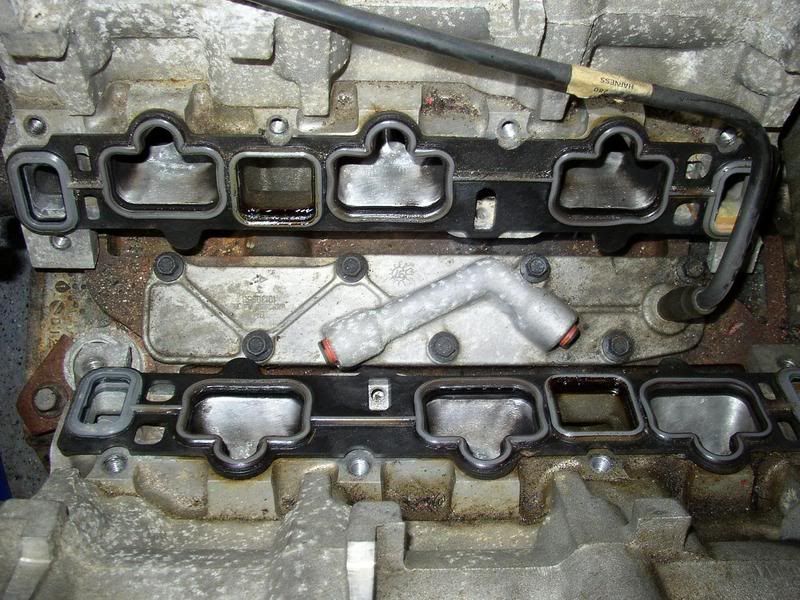


    If I had to give quick rough measurements, overall I would say it's probably 8 inches wide (from head to head at its widest point), 6 inches tall, and maybe around 22 inches long. These measurements are only the LIM and do not include the fuel rail.
    -60v6's 2nd Jon M.
    91 Black Lumina Z34-5 speed
    92 Black Lumina Z34 5 speed (getting there, slowly... follow the progress here)
    94 Red Ford Ranger 2WD-5 speed
    Originally posted by Jay Leno
    Tires are cheap clutches...

    Comment


    • #47
      Thanks for the imagery that explains what you imagined. I was pretty wrecked for lack of sleep last night and failed to remember that in February of 2009, I actually looked at your solution side then and discovered (as the attached photos will display) that I could not make any of this work for several reasons: (1) The tubing material the fuel rails on the later model 3100-3400 GM 60* Engines is made of a plated/coated thin steel that does not lend itself to either bending, brazing or welding without either using an electrical contact welder or Tungsten Inert Gas for reworking the parts into anything I could use for this project.... and ...(2) The in-port interface for the fuel injectors are all either canted or angled and made so close and flush with the main rail piping that even if I could cut them off and attach them to another rail design... I'd FUBAR the welding and ruin them for any good use. As you can see from the dated receipt on my purchase of two NOS style Fuel Rail Blocks from Summit at the beginning of this year...I was trying (contrary to SuperDave's notion that I'm so keen on over-engineering as a means to an end) to come up with something simple, direct and elegant that would also serve the many masters of need for quick disconnect, effective sealing of the fuel pressure ...and most important for the Flow Balance Test... a straight, vertical shooting vector downward for the EFI Cleaner to spray into some six (6) matched, graduated cylinders. In the end...the bevel angled GM Fuel Rail I went with was a compromise that will have to hold until I can re-engineer a better solution. The truth is...I had to do it this way initially so I could at least get something done and prove out the basic design idea of my machine and show the value of it actually working... and now that I know that it does... I am seeking some improvements to match the industrial grade versions in overall capability. Its interesting to find that your collective ideas have paralleled my own, step for step on this project. What I would not give to have the knowledge and access to the materials and equipment that CNCGuy and Forced_Firebird know how to use...
      Attached Files
      Last edited by 60dgrzbelow0; 10-15-2009, 06:40 PM.

      Comment


      • #48
        Holy Smokes...! I think I've GOT it!!! I don't know why I didn't think if it B4... All I need to do is add an angled bracket to the threaded support rods and bolt the other end to the two Fuel Rail support holes in the outer cast aluminum block of the Fuel Rail Assembly! Doing it this way would angle the whole Fuel Rail over until the tips of the Fuel Injectors are pointing STRAIGHT DOWN! Moving the Fuel Rail around this dynamically will NOT affect the EFI Cleaner Feed Hose attachment on the Fuel Rail Schrader Valve and will NOT hinder the use of the EFI Electrical harness, either!

        Done!...

        Naturally it would easier if I had some sort of wide support bracket coming through holes drilled on either side of the Vertical Angle Iron Frame Supports. I just need to drill a small hole at the same height in both Upper Frame Arms to be able to feed a steel rod through them, fitted with some simple brass bushings or bearings mounted on both ends there and then somehow attach the rod ends to either side of the Fuel Rail. Then when I want to re-position the whole Fuel Rail Assembly, all I need to do is un-tighten the supporting rod assembly and rotate it back and forth (like a Rocking Chair or maybe a Pig on Barbecue Spit...) to move the Fuel Rail from one vertical position to another for both banks to be able to achieve this proper vertical position! ... but I'll work on that later... at the very least...I can use the pre-angled brackets idea first to get the Fuel Rail positioned just right and test it to see if this will work. Now all that remains is for me to design a sort of Holding Platform to support the 50ml Graduated Cylinders under each EFI Nozzle and turn on the machine and see how they compare! Gentleman...it is great to knock these ideas around with you guys! THANKS!!!
        Last edited by 60dgrzbelow0; 10-14-2009, 11:25 AM.

        Comment


        • #49
          Okay... on the heels of this morning's inspiration... I set about making the modifications to "The Frankinjector" machine that will now allow me an easy way to do the EFI Fluid Balance Test... and with unbelievable ease, too. Many thanks to all who poked and prodded my thinking here... because in the absence of this collaboration on www/60degreev6/com ... I may not have gotten these ideas in any other way! When I first imagined doing this... I thought about Superdave's parsimonious admonition on "over-engineering" it any further. So I took the simplest route I could think of in using JB-Weld to fix some threaded rods in line with the axis of the Fuel Rail's possible center of rotation. But this wasted about an hour of my time and I abandoned that build for the ones shown in the images and newest video here:

          Store your photos and videos online with secure storage from Photobucket. Available on iOS, Android and desktop. Securely backup your memories and sign up today!


          That design took a bit longer to engineer because in spite of being a great construction material...Angle Iron (the residue of the sacrificial Bed Frames) is a bit difficult to work with when making parts that have to work in closer quarters than the original standing frame requirement. In any case...I adhered to the idea that once built and installed on the frame... the ability to rotate and adjust the position of the Fuel Rail for any number of reasons had to follow the idea that it would NOT be off center...regardless of the position I needed it to be in. And so...a few hours later...with a bit of labor and measuring thrown in...for "Good Measure"...I give you "The Frankinjector" REDUX version that now includes the axial re-positioning as described in my photos. etc. now on my Photo-Bucket site. I will be anxious to see what you think of this "angle" and let me know if I missed anything that needs more work. To the nearly thousand viewers of this thread... thanks for your patience in watching me stagger around with this while trying to make this idea become real. I think I have had a very good day with this improving the design and functionality of this device! Tomorrow morning...I'll button up all the parts and pieces and introduce the 50ml Graduated Cylinders to the fray (I've got to design a tray of some kind and use the two vacant holes in the cross-member that are now free and and see how things work out).
          Attached Files
          Last edited by 60dgrzbelow0; 10-21-2009, 07:20 PM.

          Comment


          • #50
            Okay... This morning, I assembled only the parts of the "Frankinjector" equipment necessary to perform the Fluid Balance Test on six Rochester Multech EFIs for the VIN "S" GM vehicles. You will note from the photos and videos on this update via my photo-bucket link, that I decided to use the "KISS" Principle on the design of a tray to support the 50ml Graduated Cylinders by using a deep-dished stainless steel, magnetically attachable tool tray to support the collective tubes and simplify the need to build one that I would have to design another quick-on and off mechanism. Because the Fuel Rail has a staggered design, when rotating the Fuel Rail to do first one set of three injectors on one bank and then the other...moving the tray off center as necessary to support the tubes is a snap. Spills are easily captured and contained and so is the cleanup after finishing this test. I left off all the acrylic drain tube plumbing as it was not needed for this testing method and would have actually been a hindrance in getting around for this exam.

            They say you should be careful what you wish for... and in this case, the test(s) did reveal that this one set of injectors does have some performance differences that can only be reconciled by mixing and matching injectors from other sets that more closely fall in line with each other in performance or by further cleaning via the hot-soak in Purple Power and maybe back-flushing (...if I can figure out a way to do it using the existing Fuel Rail). I have one more set of EFIs to evaluate on hand and the other identical set (with fuel rail and electrical harness all for just a ten spot) will be arriving soon. The set up and break down of all this integrated hardware has proven very smooth and easy to handle. When not in use, the acrylic plumbing fits nicely in an over-sized Zip-Lock Bag and likewise for the six Polypropylene Tubes, so that shop dirt and contaminants do not get all over them. Keeping the rack with the rotating Fuel Rail assembly from getting under foot has proven itself very "storage friendly" and the whole upper portion can be covered with a long trash bag to keep the shop dirt from making a mess of this equipment. On the whole, this kind of "One Over The World" idea for the design of this machine has proven itself out at every turn!

            This takes care of the problem of conducting the "EFI Fluid Balance" portion of these comprehensive testing and cleaning procedures. Up next to try and solve is how to isolate and protect the wiring harness from shorting out and making direct contact with the hot cleaning solution when the EFIs are being dunked in the UMAX Ultrasonic Machine...

            Store your photos and videos online with secure storage from Photobucket. Available on iOS, Android and desktop. Securely backup your memories and sign up today!
            Attached Files
            Last edited by 60dgrzbelow0; 10-15-2009, 02:41 PM.

            Comment


            • #51
              The other OTC EFI TESTER just arrived and I attached one Multech EFI to each one to see how these units behave in tandem. I shot two videos just now that give a better performance impression than this paragraph can explain. Please note that I managed to get both to work off of a single, 12 Volt 110 AC Power Supply that I have been using for just the one OTC Box on all of the video posts done so far. Here is the latest link to the newest stuff...

              Store your photos and videos online with secure storage from Photobucket. Available on iOS, Android and desktop. Securely backup your memories and sign up today!
              Last edited by 60dgrzbelow0; 10-15-2009, 10:02 PM.

              Comment


              • #52
                Okay...The "Under $10.00" set of EFIs, Fuel Rail w/feed lines and Complete Wiring Harness came in just now. I snapped some images because I was curious if anyone has even seen this kind of early model Fuel Rail with that odd side port in it...Just curious to know what makes/models use this feature...and for what reason. The other idea here is to show that it is possible to get some of the primary components/parts and pieces that have gone into building this prototype machine without dropping too much coin down the drain. I'm puzzled as to why there is so much attention being paid to this project by "The Lurkers" with so little feedback on what their thoughts are. Now to paraphrase Slim Pickens as Major T.J."King" Kong in Dr. Strangelove, "I've been to World's Fair, a Picnic and a Rodeo..." and I've had my ass whipped a time or two in my day... and given back more than I ever got, so I can take the honest criticism if it needs to come my way. Don't be shy, Folks... Jump right in...
                Attached Files
                Last edited by 60dgrzbelow0; 10-16-2009, 08:31 PM.

                Comment


                • #53
                  you should switch to a better power supply, a 12V 5A unit is dirt cheap and will last longer.
                  Past Builds;
                  1991 Z24, 3500/5 Spd. 275WHP/259WTQ 13.07@108 MPH
                  1989 Camaro RS, ITB-3500/700R4. 263WHP/263WTQ 13.52@99.2 MPH
                  Current Project;
                  1972 Nova 12.73@105.7 MPH

                  Comment


                  • #54
                    Originally posted by Superdave View Post
                    you should switch to a better power supply, a 12V 5A unit is dirt cheap and will last longer.
                    Dave... is it something I can search for by Brand Name/ Model etc.. Perhaps on eBay? By the way...I'll try and shoot some live video of the cleaning of those gnarly EFIs... just to see if I can capture the changes they go though from start to finish and have the means to visually compare the differences when they are fully cleaned again.
                    Last edited by 60dgrzbelow0; 10-16-2009, 05:08 PM.

                    Comment


                    • #55
                      you could modify a computer power supply for it. i have considered it before, and happen to have an extra one that pushes more than enough power for something like this...
                      1995 Monte Carlo LS 3100, 4T60E...for now, future plans include driving it until the wheels fall off!
                      Latest nAst1 files here!
                      Need a wiring diagram for any GM car or truck from 82-06(and 07-08 cars)? PM me!

                      Comment


                      • #56
                        or why not buy something like this. i have a car stereo hooked up and a scanner. although mines a 13.8v 3amp model from radio shack.

                        ive had this thing for a good 10yrs with just the scanner hooked up. it doesnt get used much but it doesnt have a problem with both the radio and the scanner running.


                        but i did modify a laptop power adapter supply unit to power the off-board unit i built to flash pcm's out of the car.
                        sigpic
                        99 Grand Am GT
                        3400/3500 -Solid trans mount--TCE 65mm T-body---85mm LS2 maf---1 1/4' TCE intake spacers with 3400 upper--SLP Catback with flowmaster 80--TOG headers
                        Modded 3400 lifters with LT1 springs---Comp Cams 26986 Springs
                        1357 cam 227 233 .050 dur
                        515 515 lift 112 lsa
                        15.232@88.85mph on stock 3400---New time to come


                        Comment


                        • #57
                          Originally posted by geldartb View Post
                          ...or why not buy something like this? I have a car stereo hooked up and a scanner; although mine is a 13.8v 3amp model from Radio Shack.

                          I've had this thing for a good 10yrs with just the scanner hooked up. It doesn't get used much but it doesn't have a problem with both the radio and the scanner running.


                          but i did modify a laptop power adapter supply unit to power the off-board unit i built to flash pcm's out of the car.
                          Thanks for this information... a match to Superdave's specs and comments...but your highlighted reference alludes to diminished performance with a weaker PS ...I'm just trying to understand how that would translate to the six EFIs and so I am wondering how they act when the PS is insufficient...what would the symptoms be across the array of injectors using the two wires that leads into the stock EFI Harness? What should I be looking for in the way of problems. Also... this more powerful and stable PS...at well over 12 Volts...Will the Dual OTCs be sort of "over heating"...or what can I expect? Those twin devices represent the most expensive part of the machine...and obviously the most critical to how well it performs repetitive cleaning episodes. Would photos of their insides give some clues as to what they are doing...or not doing? (without any intention to violate any patents on their proprietary designs...of course...)

                          This thread originated because I really wasn't kidding when I said that me and electrical issues have never been on equitable terms... so now that the conversation has gone from the theoretical side over the last week or so into the making something that really works, my understanding of the consequences will go a long way toward keeping me out of trouble and ruining both OTC Testing Units.

                          Also... Am I remembering correctly that you are a former GM Tech employee? I seem to recall some threads where your input threaded the GM needles more often than not with the correct solutions.
                          Attached Files
                          Last edited by 60dgrzbelow0; 10-16-2009, 08:48 PM.

                          Comment


                          • #58
                            Originally posted by robertisaar View Post
                            you could modify a computer power supply for it. i have considered it before, and happen to have an extra one that pushes more than enough power for something like this...
                            On the subject of modifying a 12V/5V Computer Power Supply...I've got a large cardboard box filled with them somewhere around here... LOL

                            This problem I'm having with "Basic Electricity" has not affected my abilities, however, to build and fix computers (going back even to the days of the original 8086 Microprocessor at a SCREAMING 4.77 Mhz...)

                            I have five systems running in the house serving one purpose or another...all built from scratch and running either Windows 2000 Professional or Redhat Linux (Fedora . I've also been getting (stealing?) three or four IBM ThinkPad A31-A31P Business Class machines a few pieces at a time off eBay and they are all like having good Mules... Not very pretty...but they work hard and have so much flexibility... But unlike the Mules...you don't have to hit them between the eyes with 2"X4" soaked in motor oil to fix them... They fix real good...
                            Last edited by 60dgrzbelow0; 10-16-2009, 08:15 PM.

                            Comment


                            • #59
                              Because of the suggestions here that the power supply might not be delivering enough "punch" to the EFI coils... I went back to take another look at the second video I shot on "Fluid Balance Test #5" trying to explain why the fluid in the cylinders seemed to be "staircasing" evenly upward as you move the view from the front to the back of the rail. I thought it might be from some kind of pressure draw or imbalance inside the rail itself...but now I'm wondering if it is not all due to the OTCs being designed to test single injectors...rather than three at a pop as I am making them do. The ideas about having a stronger Power Supply and higher amperage... how would that affect the performance of the dual OTC units? Of course I had this crazy notion that it might have something to do with the differential length of the wires in the EFI Harness (Crazy...right?) but then I realized that with only a foot and half to travel...the electric current can move about the length of a un-sharpened No.2 pencil in a pico-second... so I threw out that stupid notion... but it must be the way the juice is acting IN the line has to be a factor here somehow in which injector is getting the best of the power... Yes?
                              Last edited by 60dgrzbelow0; 10-16-2009, 08:46 PM.

                              Comment


                              • #60
                                Originally posted by 60dgrzbelow0 View Post
                                I snapped some images because I was curious if anyone has even seen this kind of early model Fuel Rail with that odd side port in it...Just curious to know what makes/models use this feature...and for what reason...
                                Never mind on this "Q"...I found the dope on this item... (image)
                                Attached Files

                                Comment

                                Working...
                                X