 Tweet
Tweet
Originally posted by MantaGreen97
View Post
-
Put an impact socket on the torque wrench if you don't have a breaker bar. -
I broke the first 2 sockets on the first bolt when I pulled my heads. I picked up a 15mm impact socket at autozone. They sell them seperately. Then I put a long pipe at the end of a good 1/2 inch rachet I had and they finally came loose.Last edited by TazMan; 06-10-2007, 02:59 AM.Comment
-
Angle meters are for wussies. Mark each bolt head all the way across with white-out, parallel to the crankshaft. Then turn each bolt 90 degrees. You can look at the white-out marks to verify that each bolt has been turned properly.
I agree with firebird about Harbor Freight. Northern sells similar tools in other locations. I have some cheap-ass harbor freight impact sockets that i've used daily working on diesels for about 11 years now. Never broke one.
Pawn shops may or may not be worthwhile, depending on where you are. I've had real good luck in Houston, TX and Lincoln NE. Not so much in Colorado Springs, CO or Knoxville TN. I've yet to find a single good deal here in Wichita, KSComment
-
Thanks for the help everyone. I didn't want to use the torque wrench because you're not really supposed to use it as a breaker, and I do have a 20" ratchet I was using instead of a breaker, initially...
Got a rental car, and I picked up an 18", 1/2 drive breaker bar (the largest one they had in stock at Princess Auto) and got shallow and deep 15mm impact sockets and it seemed to do the trick with a bit of effort The breaker bar did better than my 20" 3/4 drive ratchet, I guess because the ratchet actually "clicked over" on me (doesn't seem to be damaged though), plus the use of the impact socket was definitely what did it. I picked up new replacemnt normal sockets at Sears for the two I destroyed, lol.
Also couldn't get any pipe smaller than 5ft at Rona, so I just bought that, lol, figuring I'd cut it if need be. I did use it on one stubborn bolt on the front head so far, and yeah the bolt turned heh.
I think I'll also be able to get the rear head off without taking the valve cover off (the rear bolts are in the open and the ones towards the "vee" are uncovered enough that hopefully I'll be able to get them off as well) and then I can just get the valve cover bolt off with an easy out I think.
LOL yeah I figured that since it was a +90 degree addition, the meter wasn't really necessary as it's not really hard to figure out when you've turned 90 degrees (it's just 12 o'clock to 3 o'clock). But, it was only like $5 so I figured might-as-well...Originally posted by tractorman View Post
Oh also I live in Canada, so Princess Auto works good for me
Comment
-
Other than being unneccesary, my only gripe about angle meters is that if it slips off for some reason... then you don't know for sure exactly how far the bolt has turned. You CAN turn the bolt more precisely with that meter, though... and that's definitely worthwhile. I'd suggest that you combine my white-out method with your torque meter method... in which case you'll be able to turn the bolts precisely AND have a visible indication of how far the bolt has turned with the meter removed.
About your rear valve cover issues... I've removed the rear valve cover from my '94 Corsica a couple of times with no problem, and it's the same body-type as your Grand AM. Granted, it was tight... but the right tools combined with patience can go a long way. Not being in Canada, I can't just show up with my 1/4" socket set and remove the bolt for you, but I have a couple of suggestions as to how you might do it. It'll make your life a LOT easier if you can remove that valve cover.
First idea: There's a trick to your upper motor mount that'll allow you more room behind the engine. I wasn't aware of it until somebody on this site mentioned it. Notice that the upper motor mount bracket on the passenger side of the engine is held in by three bolts: Two are accessed from inside the right front wheel well, and one bolts into an enlongated slot right next to the bracket. Remove the two bolts from the wheel well. Loosen the one in the slotted hole. Grab the engine and yank it toward the front of the vehicle- the whole thing will rock foreward as the motor mount bracket slides in that slot. Now, snug the bolt in that slot, and it'll stay. This will yield you significantly more clearance behind the engine.
About that stud that's giving you fits. It's never caused a problem for me... not sure why you can't get a socket on that valve cover bolt. But if you really need to remove it, there's a better way than the one you've described. Once the coil bracket is removed and out of the way... if I recall correctly... you can put a deep well (probably 13mm) socket down over the stud and remove it that way. I may be talking out my A$$ here, as I've never had reason to remove said stud... but I'm reasonably sure that a deep-well socket will take it out.Comment
-
Thanks for the tip, I'll do that thenOriginally posted by tractorman View Post
The problem with the rear valve cover isn't so much as getting to it but it's getting to the socket on, so it's straight and not angled. Even with a 1/4 drive tools and a u-joint it won't get on there straight. The reason is simply the stud that is there for the ignition coil packs/module is directly in the way. Despite the indent in the valve cover itself, the socket still can't get on there straight. I tried to remove the coil pack stud, but I can't get it off, as mentioned. Making matters worse I rounded off the nut a good bit as far as I can tell, so I don't think I have a choice with the rear cover. I'm not really seeing that much of an issue with it being on though. The head bolts under the cover are quite easy to get to, I'm not sure if the rear ones that aren't under the cover are going to be harder because of the cover still being on...Originally posted by tractorman View Post
Which brings me to my next question actually...
I removed the rear exhaust down pipe or whatever from the manifold, but it seems like a lot of trouble to get the heat shield bolts off and then the manifold bolts look like they are even trickier. On one side both "halves" of the heat shield are actually corroded away right near the bolts, so the bolts aren't even holding it on, LOL. But on the other side the bolts are holding the heat shield on, and one of them (near the bend for the crossover connection) is actually right underneath the trans dipstick!
I wonder what they were thinking when they designed this, I mean didn't they think "oh wait the trans dipstick on this application is going to be in the way, lets put the bolt for the heatsheild somewhere else"? No apparently not!
So what I'm curious about is, can I actually just undo the head bolts and rip everything out at once? I mean the heads with the valve cover and the exhaust manifolds and everything, all on there? It looks like it's possible--there seems to be enough room for that IMO. So can I do that? Remove the head just leaving the exhaust manifold connected? (The pipe that goes down to the converter is disconnected, as mentioned.) Is there any reason that's a bad idea?
Actually it's a bit different on my car I believe. What you describe is actually how the mount looks in the service manual but that's not how it is on the car. There are two bolts up top on the mount, that hold the mount cover on, and there are two bolts that hold the "arm" to the mount. Then there are three bolts on the machined arm that hold the engine. I already undid the mount because you have to on this application, to get the last power steering pump bolt off. And yeah I had my fun there because the engine drops pretty good when you undo those bolts, even with the jack under the oil pan as mentioned in the manual. So I actually put the engine back on the mount and it was hard enough for me to do that, I really had to yank on the lift/support loop thing to *just* get the bolts for the mount back where they go. So undoing that only let the engine fall backwards (giving even less room at the rear), I seriously doubt I could get it any farther forward, at least not on my own...Originally posted by tractorman View Post
Yeah I don't know why either, but definitely theres just no way to get the socket on squarely and engage the ratchet, even with the u-joint on it. I can get the socket on square but can't engage the ratchet or u-joint on it like that.Originally posted by tractorman View Post
Also a deep well socket will not remove those particular studs, at least not the ones I have. The studs are round at the bottom! They don't have a hex base, it's just round
  I don't get that either. I'm thinking I'm going to have to get replacements for those for the new heads (I have to get all new exhaust studs anyway as a few were strangely broken on their own, on the front side, and I don't know about the rear yet.
Comment
-
If you can take the exhaust manifold off with the rear head. It's easier then busting your knuckles trying to get it loose while it's still on the car. Exhaust studs commonly break off, so don't be surprised if you find more that are also broken. I was almost sure the coil pack stud came off just like tractorman said. At least I think mine did.Comment
-
the coil pack studs come out, i've taken them out many times...
I don't see the huge issue, just unbolt the downpipe, take out that stud and the rear valve cover will come right off.. I've removed them from a 3400 while still in the car. Then just put an impact on the head bolts.
If you'd like i could strength test the headbolts for you, i know my impact will do 300+ lbs of TQ...
People have used those headbolts to hold their fully built engines up on the stands before (although they are the wrong thread pitch/size).
If you're desperate then these may become your best friend... (Last resort only!)

Comment
-
NOooooo... HELL NO!
Don't get vice-grips anywhere NEAR that engine. That's just asking for heartache and pain. If you're breaking sockets, then all vice-grips are gonna do is round bolt heads off.
Vice-grips ain't a last resort, anyhow... a welder is a last resort. I used one on a series 60 Detroit head bolt the other day.
About rocking that engine foreward- ratchet straps are your friend.Comment
-
Okay well thanks for the help everyone
I managed to get everything off the engine, the only thing left now really is the valve cover which I think I have to cut the ignition module stud off, to get at properly. The ignition studs will not go anywhere and the top ends where the little hex area is, just spins/rounds and there is nothing else to grab so I'm gonna have to get new ones. I do realise they are supposed to come out, I'm just saying that is not looking possible on my head unfortunately.
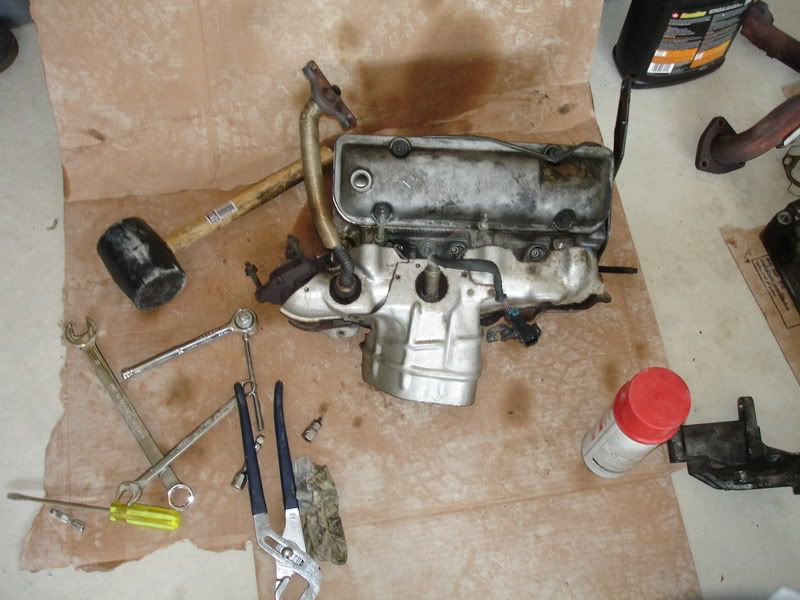
Here's a pic of the entire rear assembly... Head, valve cover, exhaust manifold and all... It was pretty easy to remove the head with everything on it.
Managed to salvage about 12 of 16 of the exhaust studs on the heads, the rest broke off in one way or another.
So now really I'm just in the process of cleaning up everything, might paint a few things like the valve cover and the 3100 text on the new plenum, and then put everything back together. So it should be a lot smoother sailing from here on in
Comment
Comment