 Tweet
Tweet
I am parting out my 2000 GAGT project car and therefore I will be offering my supercharger project for someone else to finish and enjoy.
Price: $900.00 OBO

Please Read:
This is not a bolt on and go kit, it will require a few things which I have done my best to list below. Please see the detailed description with pictures on how to complete the kit. Once complete it should be just as reliable as the much sought after Eaton units and provide similar gains for a fraction of the cost if you can find one for sale. If you need more pictures or further details don’t hesitate to contact me. I can be reached by PM or by e-mail at Pglassley at gmail * com
See all pictures at: http://s122.photobucket.com/albums/o.../Supercharger/
Sale Details:
This will be sold to the first person that has money, so if you want “dibs” please make sure you have money or contact me if you have something else in mind. The price does not include shipping, therefore make sure you provide me with a zip code and I will get you a total price with shipping. If paying by paypal please add 1.5% to the total or you may send payment as a gift to avoid paypal charges. I have sold many items over the years on GAGT, GAOC, Alero Mod and 60degreev6 without any complaints or problems. As for another reference my ebay user name is Scuba_Dog_01 in which I have over 220 transactions with a 100% feedback rating since 2001
Project Background:
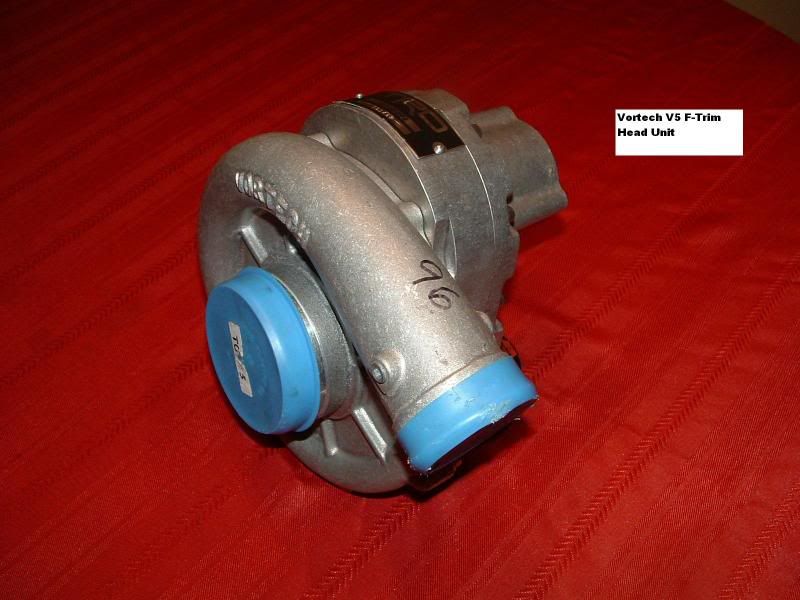
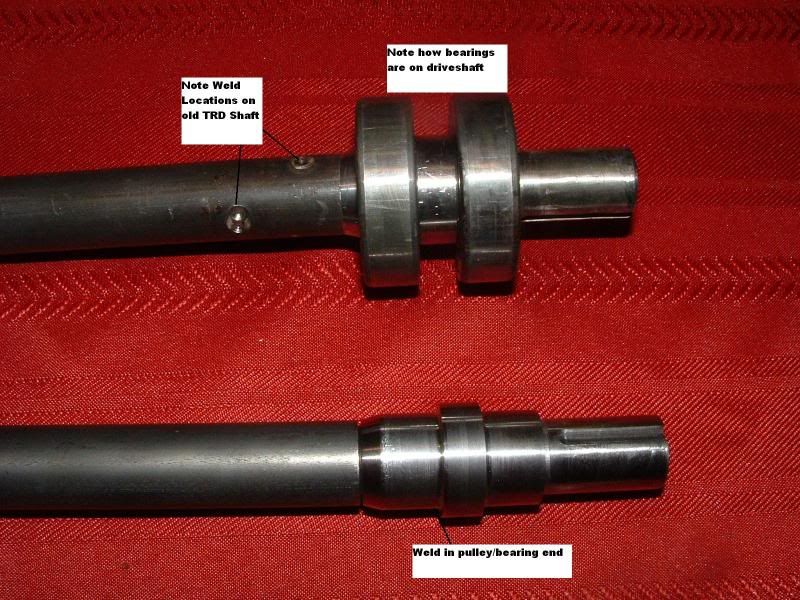
The project started out with the following goals in mind: Building a reliable supercharger setup for a grand am on a budget. Which led me to researching the failures of the RSM/Z-Spec superchargers that many know as the “Vortech Kit” for the grand am. The main problem with the RSM/Z-Spec built kit is the bearing is only rated to 8,000 RPM, followed by the fact that they did not use a flex coupling to allow for any shaft misalignment. After much research, I picked up a brand new TRD supercharger unit for a Scion TC to modify to fit the grand am, which I was pleased to find a double bearing set on the pulley end of the shaft, as well as a flex coupling identical to those used on an Eaton supercharger. As the TRD shaft was too short I worked with a local machine shop to have some of the parts recreated for the project. The supercharger is a Vortech V5-F trim supercharger which is designed for use on 1.6 to 4 liter engines. You can find more information on the supercharger unit at the following link: http://www.vortechsuperchargers.com/product.php?p=13
What the Kit Includes:
Brand new Vortech V5-F trim TRD Supercharger Head Unit
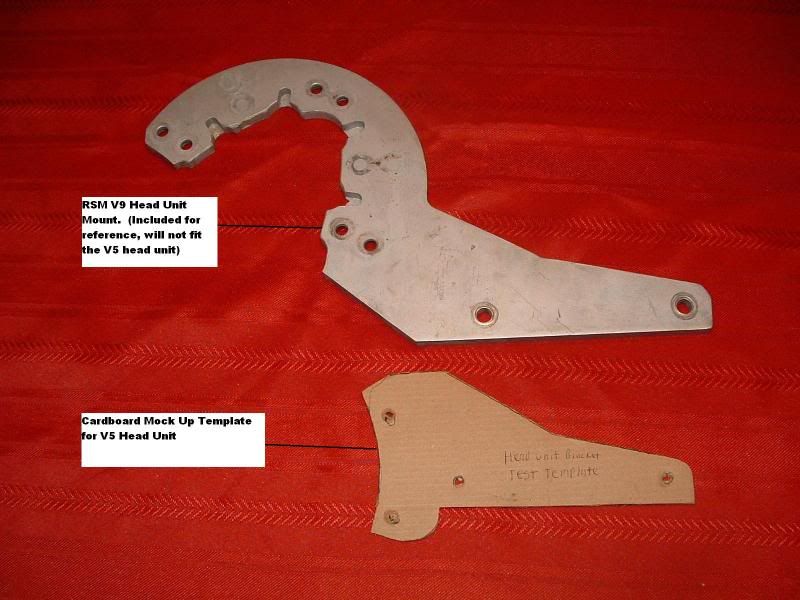
** Head Unit side mount for the V9 supercharger is being included as a reference. I have included a cardboard template for a V5 supercharger for test fitting.
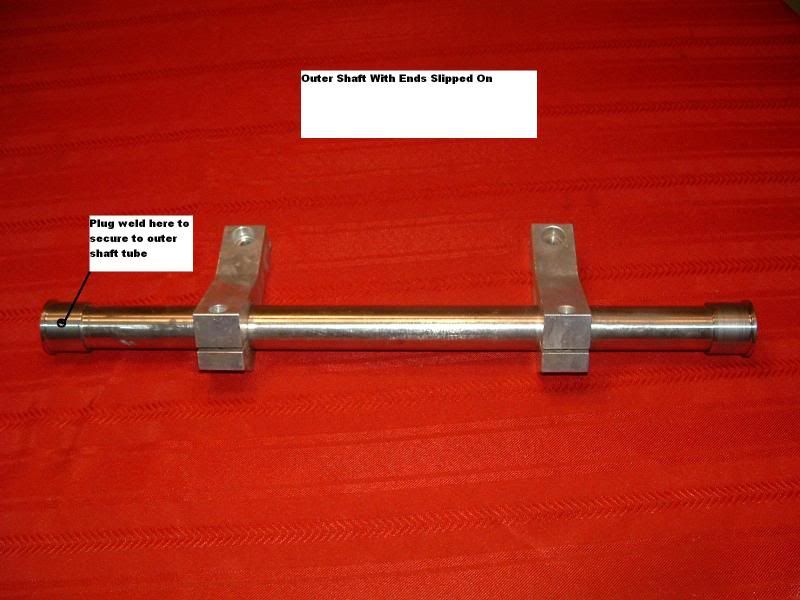
Outer Drive shaft with shaft support mounts and bearing housing
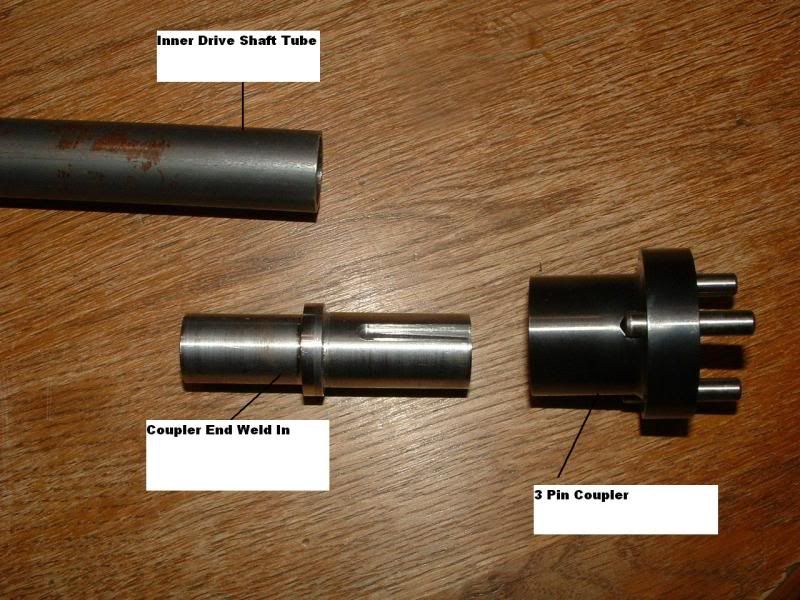
Inner Drive shaft tube with machined pulley/bearing and coupler ends **
**These two end pieces need to be plug welded into the drive shaft tube
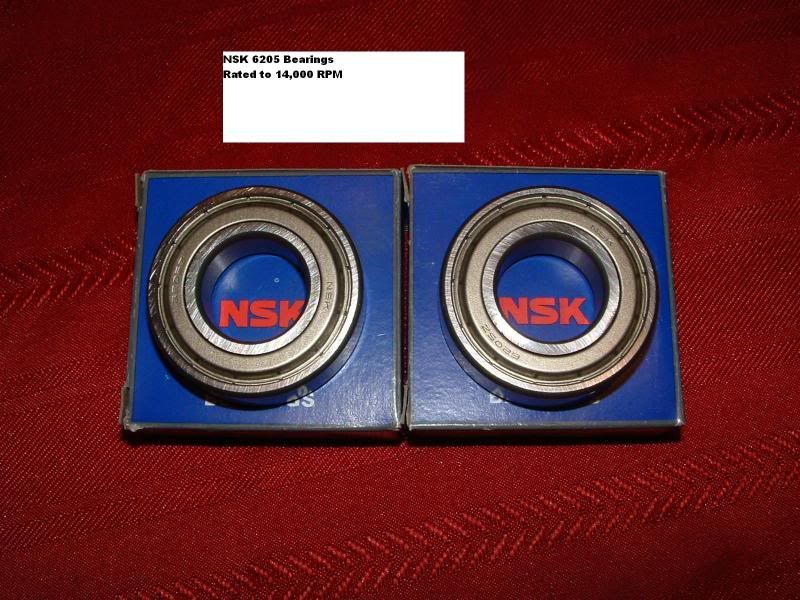
2 NSK 6205ZZ C3 bearings (rated to 14,000 RPM)
Vortech 6 Rib Pulley with retainer (used 3.25”)
Used K&N Air Filter
Extra Weld On Ends
What is required to complete the kit?
1. Design a head unit mounting plate that will secure the supercharger head unit to the transmission. Included in the kit is a head unit mount from a RSM/Z-spec kit for reference as they used a V9 supercharger that has different mounting points. I have also included a cardboard template for test fitting that was designed around the V5 head unit. With the shaft mounts and templates that are being included for reference, this shouldn’t be a huge undertaking. My preferred method of mocking up items is to use cardboard or a thin piece of aluminum draw a shape that looks like it will work and then trim little by little until you have something that fits. Once you have something that fits, you can work on refining it into something prettier. You can transfer it to metal yourself or have a local machine shop make the part from the template.
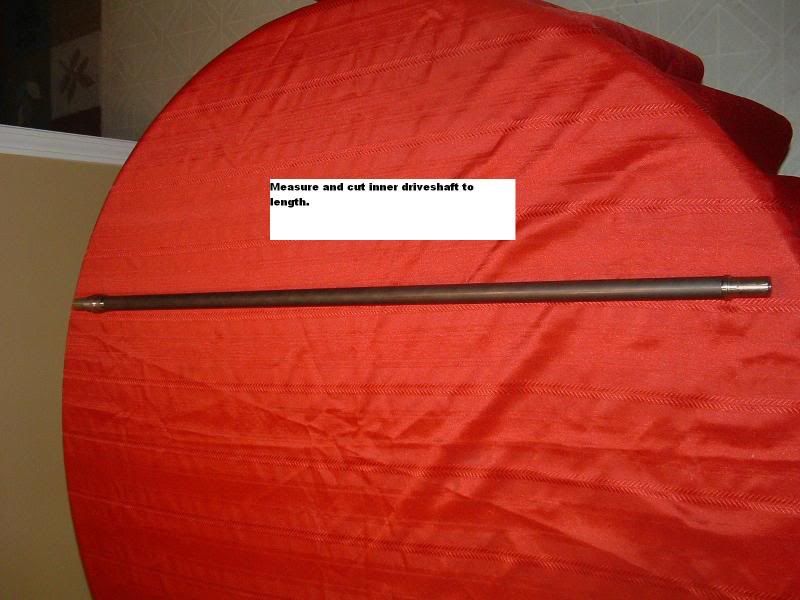
2. Once the head unit mount is done, mount the supercharger head unit in the car. Then take the inner drive tube with the both weld on ends inserted and measure where the inner tube needs to be cut. To ensure that the inner shaft tube is the proper length, you will use the supercharger pulley and align it with your belt setup.
3. Next take the outer drive shaft setup and install it on the vehicle. Measure and cut to required length.
4. Once the inner and outer tubes are cut to length, you will need to have the ends welded. Any local welding shop should be able to handle this task.
5. Once back from welding, install the bearings onto the drive shaft.
6. Assemble the supercharger and install in the car.
7. With the Vortech Supercharger you will need to purchase a feed line and tap your oil pan for the return. http://i122.photobucket.com/albums/o...r/DSCF0003.jpg
8. Run intake tubing to the throttle
Price: $900.00 OBO
Please Read:
This is not a bolt on and go kit, it will require a few things which I have done my best to list below. Please see the detailed description with pictures on how to complete the kit. Once complete it should be just as reliable as the much sought after Eaton units and provide similar gains for a fraction of the cost if you can find one for sale. If you need more pictures or further details don’t hesitate to contact me. I can be reached by PM or by e-mail at Pglassley at gmail * com
See all pictures at: http://s122.photobucket.com/albums/o.../Supercharger/
Sale Details:
This will be sold to the first person that has money, so if you want “dibs” please make sure you have money or contact me if you have something else in mind. The price does not include shipping, therefore make sure you provide me with a zip code and I will get you a total price with shipping. If paying by paypal please add 1.5% to the total or you may send payment as a gift to avoid paypal charges. I have sold many items over the years on GAGT, GAOC, Alero Mod and 60degreev6 without any complaints or problems. As for another reference my ebay user name is Scuba_Dog_01 in which I have over 220 transactions with a 100% feedback rating since 2001
Project Background:
The project started out with the following goals in mind: Building a reliable supercharger setup for a grand am on a budget. Which led me to researching the failures of the RSM/Z-Spec superchargers that many know as the “Vortech Kit” for the grand am. The main problem with the RSM/Z-Spec built kit is the bearing is only rated to 8,000 RPM, followed by the fact that they did not use a flex coupling to allow for any shaft misalignment. After much research, I picked up a brand new TRD supercharger unit for a Scion TC to modify to fit the grand am, which I was pleased to find a double bearing set on the pulley end of the shaft, as well as a flex coupling identical to those used on an Eaton supercharger. As the TRD shaft was too short I worked with a local machine shop to have some of the parts recreated for the project. The supercharger is a Vortech V5-F trim supercharger which is designed for use on 1.6 to 4 liter engines. You can find more information on the supercharger unit at the following link: http://www.vortechsuperchargers.com/product.php?p=13
What the Kit Includes:
Brand new Vortech V5-F trim TRD Supercharger Head Unit
** Head Unit side mount for the V9 supercharger is being included as a reference. I have included a cardboard template for a V5 supercharger for test fitting.
Outer Drive shaft with shaft support mounts and bearing housing
Inner Drive shaft tube with machined pulley/bearing and coupler ends **
**These two end pieces need to be plug welded into the drive shaft tube
2 NSK 6205ZZ C3 bearings (rated to 14,000 RPM)
Vortech 6 Rib Pulley with retainer (used 3.25”)
Used K&N Air Filter
Extra Weld On Ends
What is required to complete the kit?
1. Design a head unit mounting plate that will secure the supercharger head unit to the transmission. Included in the kit is a head unit mount from a RSM/Z-spec kit for reference as they used a V9 supercharger that has different mounting points. I have also included a cardboard template for test fitting that was designed around the V5 head unit. With the shaft mounts and templates that are being included for reference, this shouldn’t be a huge undertaking. My preferred method of mocking up items is to use cardboard or a thin piece of aluminum draw a shape that looks like it will work and then trim little by little until you have something that fits. Once you have something that fits, you can work on refining it into something prettier. You can transfer it to metal yourself or have a local machine shop make the part from the template.
2. Once the head unit mount is done, mount the supercharger head unit in the car. Then take the inner drive tube with the both weld on ends inserted and measure where the inner tube needs to be cut. To ensure that the inner shaft tube is the proper length, you will use the supercharger pulley and align it with your belt setup.
3. Next take the outer drive shaft setup and install it on the vehicle. Measure and cut to required length.

4. Once the inner and outer tubes are cut to length, you will need to have the ends welded. Any local welding shop should be able to handle this task.
5. Once back from welding, install the bearings onto the drive shaft.
6. Assemble the supercharger and install in the car.
7. With the Vortech Supercharger you will need to purchase a feed line and tap your oil pan for the return. http://i122.photobucket.com/albums/o...r/DSCF0003.jpg
8. Run intake tubing to the throttle

Comment